

Like me you might have wondered, do I really need to pay out for an expensive deep well when I have so much water on my property? I have spent time researching the best low cost water yet reliable filtration systems for my off grid homestead, and this is what I have found.
Off grid water purification methods include:
- DIY Bio-filters
- UV / sunlight purification systems
- Ceramic filters
- Chemical (bleach) disinfectant
- Distillation
- Boiling
Below I describe the strengths and weaknesses of each method, as well as describe how to easily build your own low cost off grid water purification system using each method.
How to Purify Water Cheaply Off the Grid
While there are a large number of expensive ready to use water purification systems on the market, in everything from pocket sized to full house models, they are not much use on off grid homestead. Commercial water purification systems generally require frequent replacement filters and other consumable parts. But, luck for us, there are inexpensive DIY or partially DIY options out there that allow for cheap and accessible clean safe drinking water to off grid properties.
| Method | Initial Cost | Filters | Disinfects | Operating Cost | Speed |
|---|---|---|---|---|---|
| Bio-filters | Low | Yes | No | Medium | Slow |
| UV Purification | Medium | No | Yes | Low | Fast |
| Ceramic Filters | High | Yes | Yes | Medium | Slow |
| Bleach | Low | No | Yes | Low | Fast |
| Distilation | Medium | Yes | Yes | High or Low | Slow |
| Boiling | Low | No | Yes | Medium | Medium |
There are two general types of water purification processes, filtering and disinfectants. Filters remove some amount of particles or contaminants from the water, but may not remove all biological hazards. Disinfectants, on the other hand, don’t necessarily remove non-biological contaminants, but take steps to destroy any bacteria, or other harmful microorganisms that may be in your water supply. Some methods actually serve both functions, although no water purification system is perfect for all situations.
Which type of water purification system you need depends on what type of water source you have available. Relatively clean sources such as rain water and spring water may not need much filtering for taste, and may just require a disinfectant pass to prevent accidental contamination by while animals. However, other surface sources such as shallow wells, streams, or rivers may contain larger amounts sediment that would need to be filtered out.
Types of Water Contamination
There are many harmful contaminants that can be found in drinking water. The EPA identifies 6 major categories to watch out for
- Microorganisms
- Nitrate & Nitrite (fertilizers)
- Heavy Metals
- Organic Chemicals
- Radionuclides
- Fluoride
While any well or drinking water source could potentially be contaminated by these natural or human created hazards, it is ultimately your responsibility to ensure that your water source and filtration system adequately handles contamination that may be present.
Drinking Water Testing for Contamination
This is the Home Drinking Water Test Kit I have found to be the best for a yearly water check up. I don’t recommend other kits out there that come with 10s or 100s of strips, because these things have a shelf life, so buying 100 strips is basically useless if you only have one water source to test. Likewise, there are many cheaper kits that don’t cover as many passable contaminants as this. When it comes to me and my family’s safety, I try to get the best I can.
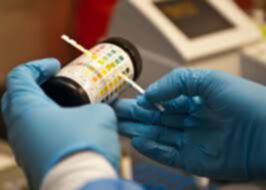
While home kits can be convent and cheap, the only way to be 100% sure that you are safe is to have your water tested periodically by people who you trust and who know what they are doing. Home kits are just not as reliable as a professional laboratory. To find certified water testing laboratories in your area, check out this list compiled by the EPA which lists them county by county and state by state.
Building a DIY Bio-Filter (aka sand filter)
Bio-filters, sometimes called sand filters, are essentially the DIY Brita style filter that can be used and built by the homesteader using cheap, easy to find materials. Bio-filters are great for filtering out sediment, removing any off tastes, and improving some forms of hard or soft water.
While cheap and easy to make, Bio-char filters, like other activated carbon filters, do not protect against bacteria or heavy metals. Depending on your situation, this may be a good first stage for a UV or ceramic system, while being a great last stage for chemical disinfectant based system. Or, it could be just right to get your well water drinkable on a budget.
How Bio-filters work
Bio-filters are constructed in three layers:
- Gravel
- Sand
- Charcoal or activated carbon
The first two layers serve as a physical screen, that keeps larger particles from passing through and allows sediment to collect in the sand layer. The final layer, charcoal or activated carbon, interacts with organic chemical contaminants, fertilizers, chlorine, and other chemically active contaminants, removing them from the water stream.
Charcoal and Activated Carbon
Charcoal should be from a clean source, and can be made right on your own property from brush or other waste wood. Charcoal is mostly carbon, which is highly reactive (hence it burns well) and the natural structure of the wood gives it a large surface area, making it react well with everything in the water.
Activated carbon or activated charcoal is a name for charcoal that has been processed by high pressure steam to increase it’s reactivity and surface area. This video shows a DIY method of making activated carbon from regular charcoal.
You need not go to all this trouble to use activated carbon, but can stick with basic charcoal. You just need a larger amount. In any case the charcoal should be well crushed before using, basically as fine as you can go without making the water turn dark.
Building a DIY Bio-filter / Sand Filter
Gravel and sand are easy to find or buy locally, but should be well washed before including in you bio-filter.
To make the filter, choose a food safe water container, such as a 5-gallon food grade plastic bucket. Cut a hole in the top and bottom and glue in a proper pipe or spigot to take out the water at the bottom and put in more water at the top. Layer in the charcoal, then sand, and finally gravel. Layers 8 inches up to 12 inches would do the trick.
The amount of water you get depends on how much area your filter has and the thickness of the layers. Wider buckets or more buckets in parallel serve to produce more water per day if the process is to slow for your needs.
Because bacteria can grow in this filter over time, the filter layers get clogged up, and the charcoal gets used up, this filter needs to be completely cleaned out and the contents replaced every so often. I recommend once a year to be safe.
Building a UV or Sunlight Water Purification System
If purifying your drinking water of potentially harmful bacteria and other microorganisms is your top priority, then UV systems can a cheap and easy alternative. UV light is widely used in commercial water purification systems as well as in industrial and scientific processes where sanitation is essential.
UV purification does nothing to remove sediment from drinking water and will not affect most chemical contamination, so you may want to combine it with a ceramic filter, charcoal filter, or other sediment filter.
The way UV light purifies water and kills microorganisms is the same reason you get a sunburn, certain light frequencies destroy cell structures and DNA. Viruses also cannot handle excessive UV light exposure.
Choosing the Right UV Bulb
Not all UV lights are made the same. To disinfect your water, the best bulbs be in the UVC band between 200 nm and 300 nm. Preferably around 260 nm for best results. The nm here stands for nanometer, and is a measure of the bulbs primary wavelength and thus frequency. When shopping for UV bulbs, make sure you check the listing for this number, as many UV “blacklights” are not in this range and will not work to disinfect your water.
This UVC LED bulb on eBay (link broken) is suitable for use in a UV water disinfectant system. UV LEDs like this one are also great when used with off grid solar systems, because they naturally run directly off 12V or 24V DC, which make them highly efficiency compared to other UV bulbs like fluorescent bulbs.
WARNING. UVC bulbs used for water disinfection are potentially harmful to humans, and can cause sunburn or eye damage. Take proper precautions to avoid exposure.
Building a UV Water Purifier
The cheapest and easiest way to use UV to purify your water is to install the UVC bulb directly in the lid of a water container such as a bucket. The bulbs should be as close to the surface of the water as is practical without submerging them (unless the bulb you ordered is water proof). Likewise, the bulb(s) should entirely illuminate the entire inside of the water container directly. There should be no hidden surfaces.
UV lights need have nothing between them and the water they are disinfecting. Most materials that look transparent to the human eye actually block UVC light. This includes most glass and all but a few specially plastics. The only easy to get material that does pass UVC light is quartz glass, which are used in specialty furnaces, however quartz tubes are quite expensive.
How Long to Expose Water to UV in Order to Purify
The total time of exposure depends on how much water you are purifying and the brightness of your bulbs. The amount of purification depends on the UV dosage, which is measured as power per unit area times time.
Water purified with UV light should be very clear in order to work correctly.
To calculate the proper dosage, check your bulb manufactures data to determine the bulbs luminous power (usually in mW). For my bulb it was 2 mW. Be sure not to confuse with with the electrical power, which be much larger and incorrect for this use case. Divide this number by the area of the circle made by the light bulb on the bottom of the container in cm^2. For me, the bulb just about covered the bottom of a 5 gallon bucket, which was 10.3 inches wide. That means it covered an area of 5.4 cm^2, which makes the intensity 2 mW / 5.4 cm^2 = 0.37.
The EPA recommends 2.5 mW s / cm^2 for 90% reduction of cryptosporidium, which is a good place to start. For my set up to reach this dosage I would need to expose the water for at least 7 seconds. More exposure isn’t bad, so leaving it on for several minutes at a time would make very sure that the water sterilized.
Simple Solar UV Water Purification
One last and very simple UV option is to just expose your water to direct sunlight for several hours at a time. This can be in a basin on a bucket. Like UVC light (which isn’t present naturally on the Earth’s surface) UVB and UV are mostly blocked by glass and plastics, which means any clear container will block the Sun’s sterilizing power. In order for solar UV purification to work the water needs to be uncovered and in direct sunlight for several hours.
Ceramic Water Filters
Ceramic water filters are simple mechanical filters that rely on the microscope pores in in clay pottery to filter and disinfect water. In this case, the pores are so small that microorganisms can’t fit through, and are stuck on the dirty side of the filter.
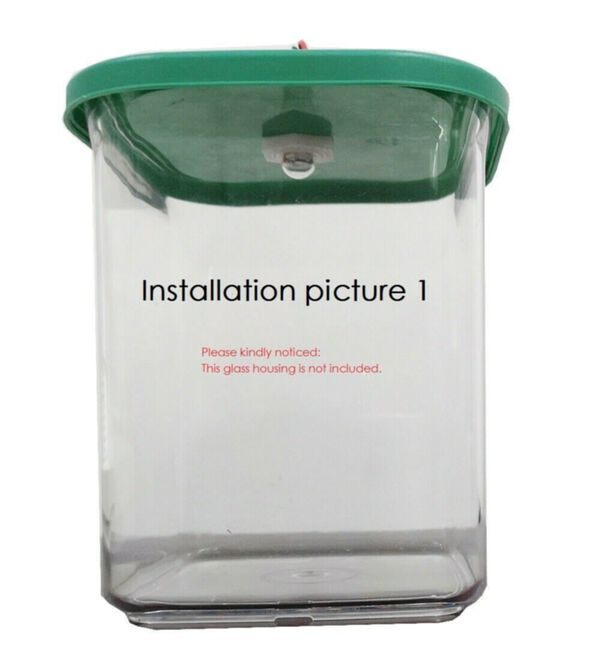
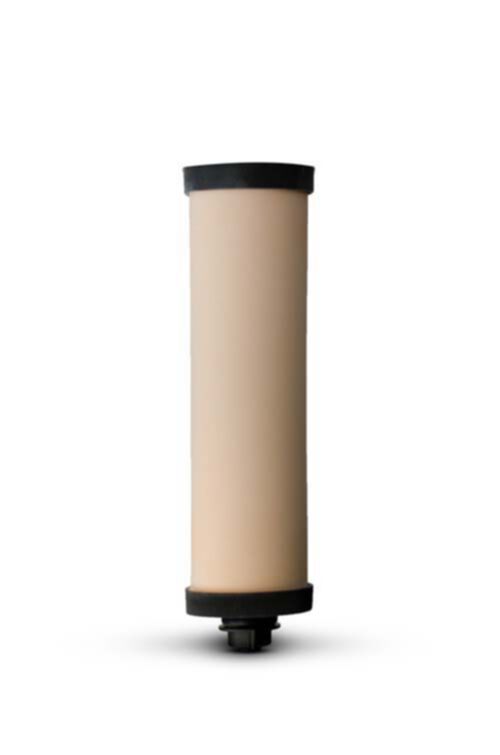
The best part of a DIY ceramic filter system is that they are easy to get going. While you could make your own filter if you have access to a kiln or skills in making ceramics, the easier route is to buy readily available ceramic candle replacement filters and install them in your own system.
My Recommended Ceramic Water Filter
I’ve owned AquaRain ceramic filters for over 5 years now, and I’m still on the first set. According to what I’ve heard, they can last 10 years or more with daily use. While the initial cost of owning a set ceramic of filters is quite high (you will need about 2 per person for drinking water alone), the fact that they last decades are will never give you unsafe water to drink, it makes them worth the cost to me.
At the end of life, AquaRain ceramic filters just clog up and stop passing water. When this happens, you can use a scrub pad to take off the top layer of ceramic, and keep them going. The filters come with a gauge that lets you know when you have scrubbed of too much over time, and the filters need to be replaced.
Some ceramic filters come with internal silver or activated charcoal cores to help with taste and disinfecting. I personally don’t find these additions to be necessary. And, while the silver core might be nice, I don’t recommend getting a ceramic filter with a charcoal or activated carbon core, unless it can be replaced separately, as it significantly reduces the lifespan of the filter.
If you are interested in the technical details of ceramic filters, check out this masters thesis “Investigations of Ceramic Pot Filters”.
How Many Ceramic Filters Do You Need?
One thing to consider is that ceramic filters are quite slow. This means you will need to have them filtering 24 hours a day to get their maximum use, and you will probably need 2 - 8 candle filters depending on how much water your family drinks.
Diy Ceramic Filter Water Purification System
To use them is quite easy. You can make your own system by simply stacking two buckets. In the top bucket cut holes the right size for your filter stem, about 1/4" in most cases. The AquaRain filters come with gaskets and screws, so you simply screw the filters in to the bottom of the top bucket sticking straight up like trees. There are also many stainless steel containers for sale just for this purpose.
Pipe the dirty water on top, and let it drip through the filter to the bottom where you can take it out with a pipe connection or directly via a spigot.
Chemical Disinfectants (Bleach) for Off Grid Water
We all know that small amounts of chlorine (aka bleach or sodium hydroxide) can be used to disinfect water. This is used in everything from small scale survival situations to large scale commercial water treatment.
Using Bleach to Purify Water
Treating water with bleach is quite simple, just add 1/8 teaspoon per gallon of water. Mix well and let the water sit for about 30 minutes or more before drinking.
While this may not be the most tasty way to purify water, it is very quick and easy. Probably the quickest method on this list. So, having a few gallons of bleach on hand as a backup doesn’t hurt even if you don’t use it as your main method. Additionally, bleach disinfectant works great as a first step before you put your water through an activated carbon filter like the bio-filter described above.
The biggest downside to this method, besides the taste, is that is requires external inputs in the form of bleach. While it would be cheap and easy to stockpile a years worth of bleach, is this really an off grid water purification method?
Make Your Own Bleach for Cheap / Free
Luckily, it is actually relatively easy to produce bleach cheaply and in bulk on the homestead. Using the same method as industrially produced bleach, all you need is water, salt, and a source of DC power such as solar panels, wind turbine, and micro-hydro. In fact, the salt water solution can actually be plain sea water, if you have access to that.
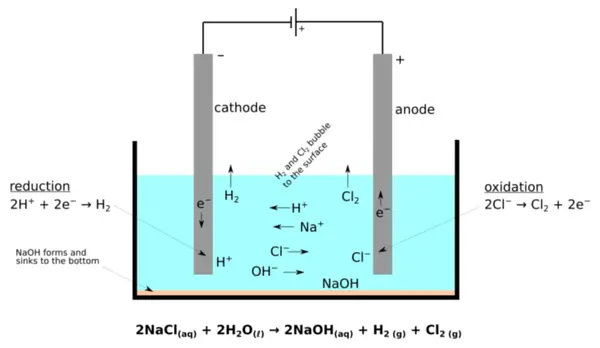
Running an electric current through salt water will chlorine gas on the positive plate and hydrogen gas at the negative plate, as well as sodium hydroxide in the water. The sodium hydroxide, if let in contact with the chlorine, will then react to form sodium hypochlorite, aka bleach.
To build your own bleach generator first start with a non-reactive container such as glass or plastic with an air tight lid. The electrodes need to be non-reactive, at least on the positive side. Stainless steel plates work best, but graphite electrodes from eBay, scavenged from inside old lantern batteries, or even pencil leads will work all right as well. You will also need wires and access to a 12V – 24V DC power source such as solar cells are a car battery / charger.
To set up, fill the container about 80% full with water, then place the electrodes a few inches apart. Close the lid and connect the electrodes to power. You should see bubbling on both electrodes, and you may see the container start to fill with a faintly green gas.
This gas is toxic chlorine, which should not be breathed. The other gas is hydrogen, which is potentially explosive. Take all necessary safety precautions to prevent ignition in the chamber, and conduct this activity in a well ventilated area. Over time hydrogen will accumulate in the chamber, and should be allowed to vent outdoors. Overall, small batches of a few gallons at a time are probably the safest route.
Using Home Made Bleach as Disinfectant
Home generated bleach is typically about 1% concentration, which is 4 – 5 times less concentrated than commercial bleach. You can measure the concentration of the bleach you produce using this method. To be safe, you should use 4 – 5 times as much of your home generated bleach to disinfect your water, about 1/2 teaspoon per gallon.
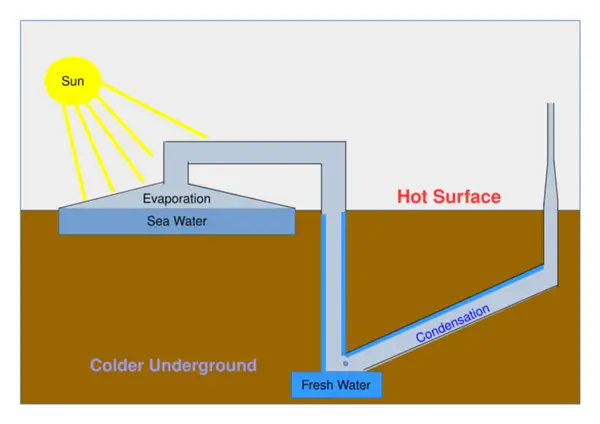
Water Purification via Distillation (Solar Still)
Distillation is the process of evaporating water to create steam, which is then condensed in a second container. This both removes contaminating particles as well as kills bacteria and microorganisms. Distilling water is one of the most effective purification techniques, as it moves almost all impurities.
While you could evaporate water on a stove or over the fire and collect the steam the comes off, this method would be quite costly or labor intensive to boil the many gallons of drinking water most households use a day. However, this might be a viable method when producing small quantities of distilled water for use in refilling lead acid batteries.
In order to make distilled water a main portion of your water, the best option is a solar water still. Solar stills can be made in many ways, but always consist of a pool of water under a piece of glass or plastic sheet. Some designs call for the glass to be tilted so that water will condense on the surface and run down to a collecting pipe or basin on the lower edge. Others (as pictured above) allow the moist air to travel in to a cooler chamber underground where it will naturally condense.
Solar stills work best in hot climates that have a lot of direct sun. In the right conditions, they could be a valuable addition to your water purification system. With piping to bring dirty water in, a float valve like a toilet to keep the pool full, and a way to pump purified water up to a tank, your solar still could be a fully automated system.
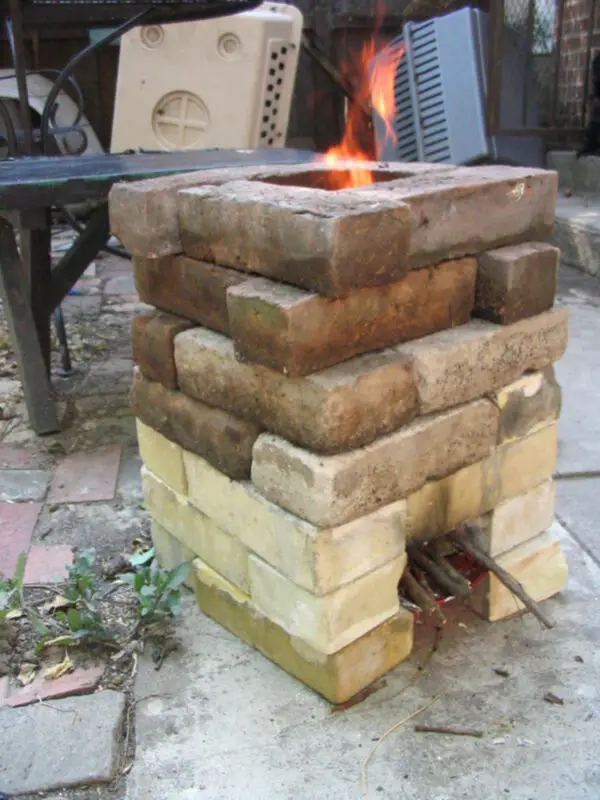
Purifying Water by Boiling
When living off grid, it pays to have backups and alternatives for emergency situations. One simple way to get clean water in a pinch is to boil it, even if that means in a pot over a camp fire, wood stove, or DIY fast to build rocket stove.
The CDC recommends bringing water to a roiling boil, then holding it there for at least 1 minute before drinking. If your water isn’t clear, you can filter it through a clean cloth or coffee filter first.
This method only disinfects water, killing potentially harmful microorganisms. Any other contamination will not be addressed.
Related Questions
How can I filter water without electricity?
Filtering water need not require electricity. Reliable methods include charcoal/bio-filters, ceramic filters, solar UV purification, chemical disinfectant (bleach), solar distillation, or boiling. All of these methods are either gravity fed or can operate without electricity.
How do you filter water off the grid?
It can be easy to filter water when off grid. Simple DIY methods include:
- DIY Bio-filters
- UV / sunlight purification systems (solar powered)
- Ceramic filters
- Chemical (bleach) disinfectant
- Distillation
- Boiling
