

The first thing people think of when they consider going off grid is the cost of installing solar panels to meet their power needs. But, when budgeting for such a system, it can be hard figure out what you actually need, and how to save money. I’ve done the research for you, and give a plane answer to how much solar power will actually cost.
How much does off the grid solar cost? Cost depends significantly on your needs and climate. A tiny one or two panel RV system can easily cost $500 - $1000 dollars, but will only supply power for very light use. Larger grid replacement systems typically $10k–15k for an average American house.
Solar is one of those things where nailing down exactly what you need, and knowing your options can save you a lot of money and trouble down the road. Read on, and I’ll walk you through the key points of off grid technology.
How to Determine the Cost of Your Off Grid Solar System
In order to determine the cost of your system, we need to work backwards. First, you need to consider what your power demands are, and when they or most common. There is no “one size fits all” system, except for a system that far exceed what you actually need.
When you have an idea of what your demands are, then we can consider number and configuration of solar panels, total rating of charge controllers, battery bank size, and wiring costs.
Another big consideration is climate in seasonal solar variations. If you use a lot of power in the winter, then you will need more panels and a bigger battery bank to make it through the long hours of the night.
Step One — Determine Your Energy Usage
An accurate accounting of your power usage is essential to accurately size your off grid solar system. Below I’ll show you two methods to figure out how much power you need.
Method One
This easiest way to determine your current power usage is to look at your current power bill, and read how much you have been using. This should be listed in kWh (kilowatt hours) and is often shown month by month for the last year. Choose your highest usage summer and winter months, divide the energy used by 30 for a daily value, and write this down. We will need this for later.
For reference, the average American home in 2017 used 867 kWh / month. However, the average that year in Louisiana was 1186 kWh / month (the highest in the nation), while Hawaii was as low as 506 kWh / month.
If you don’t have a power bill, or if you plan on changing how much energy you use off grid (more or less), then go on to method two.
Method Two
In the second method, we consider our hypothetical off grid energy usage appliance by appliance. This works better if 1) to total cost of an off grid system that replaces your current usage breaks the bank 2) you intend to use alternate, electricity free methods, to replace things like air conditioning, heating, a cooking.
Listing Electrical Loads
To start this method, list every appliance, light, or any other power using equipment that you indent to use off grid, on a paper or spread sheet. Then, for each item consider how long you might typically use it in the summer and winter.
Estimating Usage
For instance, with the long daytime hours of the summer, you may only use lights for a few hours a day. While, the same light might see 6 hours or more of use during the winter. Automatic appliances, like a fridge or AC, may only run part of the time at full power, and run much longer in the summer than the winter. While, heater will run much less often in the heat of the summer, than it would in the winter.
Also consider seasonal activities. If you are someone that drinks more coffee in the winter, then consider the added usage of your coffee maker. Christmas lights use a surprising amount of power.
Don’t forget to consider charging time for battery powered devices like phones and tablets.
If you are having trouble estimating the running time of automatic appliances with a plug, then read on for an easy method skip the time and measure total power usage. Other items you may need to just use your best judgement.
| Appliance | Power | Time - Summer & Winter | Daily Energy Usage |
|---|---|---|---|
| Desk Lamp | 16 W | 2h summer, 6h winter | 32 Wh – 96 Wh |
| Computer | 80 W | 4h summer, 4h winter | 320 Wh – 320 Wh |
| Fridge | 20 W | 2h summer, 1h winter | 40 Wh – 20 Wh |
| … | … | |
|
| Summer: 392 Wh/day | |||
| Winter: 436 Wh/day |
Estimating Power Requirements
The next step is to determine how much power in watts (W) each device is using while it is on. Every device that plugs in the wall should have a tag on it, usually near where the cord enters it, that lists important electrical information. On this there will be a maximum rated power in watts, or some times maximum current draw in amperes (A). If they only give amps, then just multiply that value by the mains voltage — which is 120V in the US — to get the maximum power rating in watts. Enter this value in the power column.
Electronic items with “wall wort” type connectors or blocks along the cord will probably have electrical info on the block itself.
If your device only charges by USB then you can use the following chart to figure out it’s maximum rated wattage.
| Type | Power (W) |
|---|---|
| USB1/2 (older devices) | 2.5 W |
| USB3 (recent devices) | 4.5 W (some 7.5 W) |
| Apple devices w/ Apple charger | 5 W |
| Retina iPad w/ Apple charger | 10 W |
Note that everything discussed so far is only maximum rated power usage, which means the device cannot go over that amount, but they will frequently use less power than rated. Simple items like lights will usually be fairly close to rated power usage, and stay fairly consistent while they are on. Electronic devices, like computers and TVs, however, frequently vary quite a bit depending on how you are using them.
Calculating Energy Need
Once your list is full of daily usage times and power requirements, just multiply the two to together to determine how much energy that device needs in kilowatt hours (kWh). Do this for each of the summer and winter values, then sum the summer and winter usage to figure out the total kWh you will use in each season.
Measuring Energy Use

Another way to figure out how much power your appliances are actually using is to measure it. This is more accurate, and works for any electrical device that you plug in. To do this you will need a simple power meter such as the one I use, the old standard Kill a Watt Electricity Usage Monitor.
To use it, just plug it in to the wall and then the device in to the plug on the Kill A Watt. Then, use the device as normal for 24 hours. The next day at the same time, just press the red button on the monitor and read out the total kWh used on the display.
If you can, potentially test the item over the course of a weeks normal usage, or a month even. And if it is an item that can be seasonally affected, like a refrigerator, then it is best to test it in both seasons, but at least test it when it will draw the most power.
Devices that don’t change much while they are on, like a light, or if you just don’t have time to wait for a day, then you can measure the wattage directly with the Kill A Watt (middle button) and just multiply that by how long it will be on in a day.
Step Two — Calculate Solar Panels Required
Now we are ready to calculate how many solar panels we need.
Solar panels are rated by their how much power they would produce on a bright sunny day, using a standard Sun brightness of 1kW/m^2. How many kWh per day it will produce depends on your climate, and how much daylight you have.
The easiest way to estimate how much power you have available is to use the solar maps provided by u the US Department of Energy. Near the bottom of the page there is a box labeled Photovoltaic Solar Radiation, which you can click to show links to month by month maps. Look at each month in the summer and winter, and take note of the lowest number for each in your area.
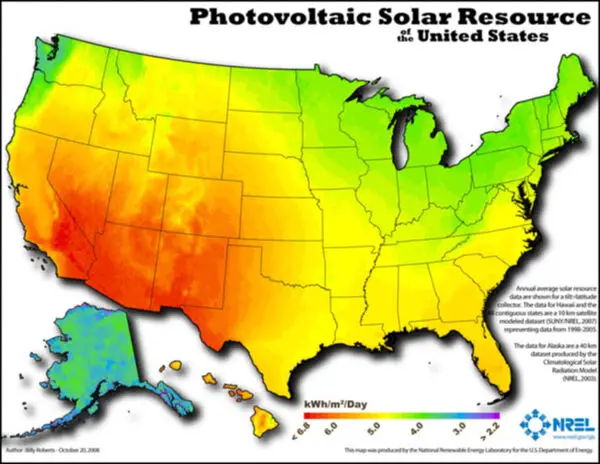
In my area, we only get 2 hours or less, and we get about 4 hours in the summer.
To get the solar panel size you need, use the following simple formula.
panelwatts = dailykWh ÷ sunhours ÷ 0.7
Here the 0.7 is an estimated total system efficiency which takes in to account losses during storage of the energy, wire losses, and conversion of the energy from the panels in to a usable form via the charge controller and potentially the sine wave inverter.
In my example I would need 140 W of panels in the summer, and 311 W in the winter. Go with the highest value of the two, and start shopping for solar panels. But, as a rule of thumb, you can get decent 100 W panels for under $100 delivered. So, I’ll estimate my panel cost to be $400, for 4 ea. 100W panels.
Step Three — Off Grid Battery Costs
After the panels, your next biggest expense will most likely be the battery storage. Without batteries, you will not have power at night, or on dim stormy days.
The most important thing to consider when sizing your batteries is how long you might need to go without recharging from the panels. If you live in a place that is consistently sunny, then you might only need 24h of power in you battery bank. However, if you live in an area, like me, where the weather is frequently cloudy you may need 3 or more days of reserve power to make it through.
One nice thing, is that you can always add more batteries, so don’t worry if you size the system too small initially.
I recommend starting with at least a full day of battery reserves. But, you are free to choose any number you like. With that in mind, use the following formulate to calculate how much battery storage you need in Amp hours.
battery storageAh = dailykWh × days of storage ÷ 12
With my example, using 436 kWh/day with one full day of battery storage I would need 36 Ah of battery storage (assuming 12V batteries).
Batteries are typically sold by the number of Ah they provide, but be aware that most types of batteries can only be discharged 50%, which means you can only actually use half of the Amp hours they put on the label.
| Battery Type | Cost (Usable kWh) | Upfront Cost | Lifetime |
|---|---|---|---|
| Sealed Lead Acid | $388/kWh/1k cycles | $388/kWh | 1000 cycles |
| Flooded Lead Acid | $240/kWh/1k cycles | $240/kWh | 1000 cycles |
| LiFePO4 | $150–$250/kWh/1k cycles | $750/kWh | 3000–5000 cycles |
| Edison NiFe | <$10 (can last decades) | $900/kWh | 10k+ |
Knowing the Ah that you are looking for in a battery bank, you are ready to go shopping for batteries.
To get a quick estimate of the battery cost based on type, I’ve included a comparison of costs for common battery types above. I’ve also included costs for the very interesting Edison batteries.
Lead acid batteries are the most common, and cheapest up front. Flooded lead acid is the cheapest up front cost, but needs fairly frequent replacement and requires frequent maintenance to work correctly. Lithium (LiFePO4) batteries are very cost efficient over their lifetime, but have a higher upfront cost.
The unusual Edison batteries that use an old technology developed by Thomas Edison that has proven itself over decades of constant use. There supposedly batteries made in the 50s that are still in constant use in certain niece industrial applications. They also can be fully discharged and are basically indestructible, unlike the other batteries on the list. They come with a fairly hefty up front cost, and they are fairly heavy. But, as a “lifetime” battery, they seem like a good companion for an off grid lifestyle.
To round out the calculations in this section, if I went with a flooded lead acid battery my 36 Ah would need to be doubled to 72 Ah rated. Therefore a single 75 Ah MightyMax would do at $140 each.
Step Four — Total Off Grid Solar System Costs
Besides the cost of the panels and batteries, there are some other components that you will certainly need, which will noticeably increase the total system price. These items include:
- Panel mounting material
- Thick copper wire
- Grounding Rod
- Battery Charge Controller
- AC Pure Sine Wave Inverter
Panel Mounting Material
Most panels come with some mounting hardware, and may have a minimal bracket. But depending on where you mount them, you may need additional hardware and support material.
Most people think of mounting panels on their roof, but if your roof is not free of shade, having a flat side facing due south, and angled just right, then you will loose considerable output from your panels. Often the best course is to mount your panels on a custom pole or structure away from the house. Read my solar panel installation guide for more info.
No matter where you place the panels, make sure they are well supported, unlikely to be hit by falling branches, reasonably easy to access (to clean off snow if that is an issue), an they have a few inches of space between them and the mounting surface for cooling. Most solar panels naturally degrade at between 1% – 0.5% per year. But allowing them to flex, overheat, or take a heavy snow load can drastically decrease their lifespan.
As far as calculating costs, I’ll leave that up to you since there are so many DIY methods to mount your panels that I can’t cover them all here.
Thick Copper Wire
Because solar systems typically run at relatively low voltages of 12–72V, they will produced higher Amps for the same amount of power. And more Amps means you need thicker wire. Thick copper wire is not cheap, an can easily run $50–$300 depending on the size of your system and how far the panels are away from the house.
The first thing to know, is what voltage your panels will be running at. Different panels come with different voltages, and with multiple panels you can choose to connect them in different ways so you can choose a higher or lower voltage output. There are various strengths and weaknesses to these configurations, which I won’t go in to here. Check out my solar system installation guide for more info.
For a quick calculation, assuming 15V is a good start. But, if you happen to know your panel voltages after you connect them in series or parallel, then use that instead.
Now, divide your panel watt rating by the voltage to get total Amps of current.
panel currentA = total panel powerW ÷ panel voltageV
For my 400 W example that rounds up to 27 A of current max.
Now, if I know my panels will be 9 feet away from where I’ll keep the batteries and other electronics, then I will need about 10 feet * 2 (you need two wires going to the solar panels). In this case I will need 20 feet of wire.
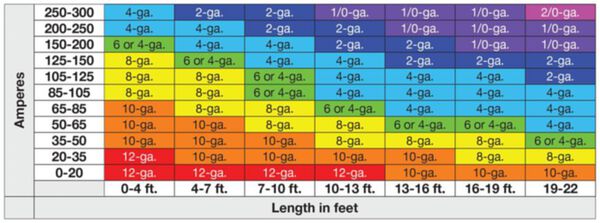
To research the cost, you will need to know how thick the wire is (the wire gauge). Use the gauge chart above along with the max current and wire length we calculated above. For my example with about 30 A max current and 20 feet of length (counting the distance of both wires), I will need a 10 gauge wire.
Price will need to look up the price for you specific gauge and length, since they change often and usually get cheaper if you buy in bulk. For reference, I was able to buy 100 ft of 10 gauge copper wire on eBay for $35 delivered in 2019.
Make sure that you buy “UV” or “Solar” rated wire, or otherwise plan to completely shield your wire from the Sun. Regular wire has a plastic coating that will bread down in sunlight which can lead to a nasty fault after a few years of service.
Grounding Rod
Although solar systems do not need to be grounded to work, including a grounding rod in your setup can help save your system from costly lightning damage and rapid degradation that can occur even if they are not directly struck by lightening.
Most building supply stores sell grounding rods and clamps for about $30 total.
Battery Charge Controller
Charge controllers help protect your batteries from over / under charging, which shortens their life. And, the help keep the power production stable.
They generally come in two types PWM and MPPT. There is a lot to consider when choosing between the two.
PWM controllers or cheaper, but will reduce the power output of your system in most cases. In general I only recommend PWM controllers for very small systems of around 400 W or less. And, only if you have plenty of panels to spare.
MPPT controllers are much smarter, and can wring the most power out of the panels you have in most conditions. This extra power comes at an increased price, but if it save you having to buy another panel or thicker wire, then it is often worth it.
Total cost for a cheap low power PWM controller can be as little as $20. A smaller budget 20A MPPT controller can be as little $80, while durable metal bodied models with the same specs can reach $200. Jumping up to 60A would cost about $20 more for the cheap models, and $50 more for the expensive ones.
For my example, in a cloudy climate, I would go with a 20A MPPT controller for $80.
AC Pure Sine Wave Inverter
Inverters turn your DC battery power in to AC power you can use with a typical plug in appliance. Since RVs typically run 12V or 24V systems, it is possible to not have any AC power at all, if you are willing to buy or scrounge up DC appliances. You also have the option of mixing the two, with some appliances the like the fridge and lights running DC, and then you would only need to buy a cheap smaller inverter for other potentially smaller uses.
I usually recommend running as much DC as possible, because it saves the extra expense of the of a large inverter. Also, inverters are not 100% efficient, more often 80%–90%. This means you may have to size up your panels, batteries, and wires to account for the loss.
Inverters are sold entirely based on the amount of watts they can provide. Tiny 300W inverters sell for about $50. 1000W inverters are more often $150–$200, while a 5000W inverter would be around $400.
When you price inverters, make sure you only buy one that says “Pure Sine Wave”, not “Modified Sine Wave” or anything else. Modified sine wave inverters can work in some applications, but can cause buzzing in motors, hum in audio equipment, and long term damage to many electronic devices.
Summing It All Up
For my small example system running only a few small appliances, the totals came out as such:
| Item | Cost |
|---|---|
| Panels (100W, 4ea) | $400 |
| Battery (75Ah, 1ea) | $140 |
| Wire (10 ga, 100 ft) | $35 |
| Charge Controller (20A) | $80 |
| Pure Sine Wave Inverter (300W) | $50 |
| Total | $705 |
